Flavor You’ll Love
There’s something timeless and deeply comforting about summer sausage. Traditionally crafted in Europe and brought to America by early immigrants, summer sausage earned its name from its impressive shelf-stability — allowing it to be safely enjoyed during the warmer months without refrigeration. From rustic villages in Germany to hearty Midwestern gatherings, this cured delight became a staple, treasured for its rich, smoky flavor and its role in bringing people together.
Personally, I am reminded of lazy summer afternoons at my grandparents’ farm, where slices of homemade summer sausage, sharp cheddar, and crusty bread were always laid out under the big oak tree. Those simple yet vivid memories inspired me to explore how to recreate this beloved treat in my own kitchen — and now, I’m excited to share it with you.
What makes summer sausage truly special is its smoky depth, its incredible versatility — perfect on a charcuterie board or tucked into sandwiches — and the fact that it can be crafted with or without fancy equipment. Even better, making it at home gives you full control: you can minimize preservatives, reduce sodium, and choose lean, high-quality meats. It’s a healthier, more flavorful alternative that brings the best of tradition and personal touch together.
Summer Sausage : Masterful Homemade
Course: LunchCuisine: AmericanDifficulty: Medium10–12
servings20
minutes3
hours200 kcal per serving
kcalFlavor-packed, smoky summer sausage that’s perfect for snacking, gifting, or charcuterie boards
Ingredients
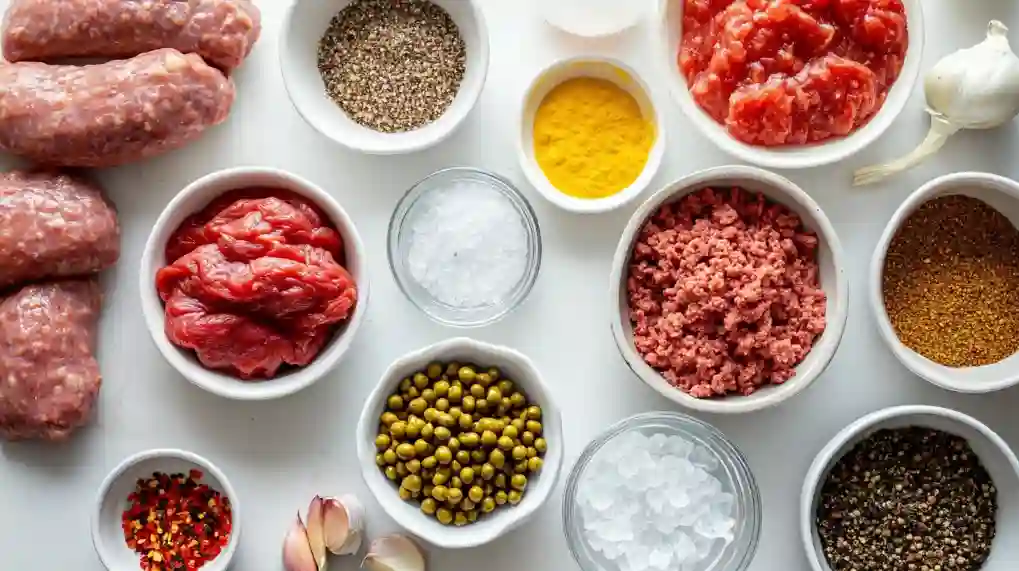
2 pounds ground beef (or a mix of beef and pork, 80/20 lean-to-fat ratio is ideal)
2 teaspoons curing salt (such as Prague Powder #1 or Instacure #1)
1 tablespoon kosher salt
1 teaspoon black pepper (freshly ground)
1 tablespoon mustard seeds (whole)
1 teaspoon garlic powder
1 teaspoon onion powder
1 teaspoon smoked paprika (for flavor and color)
½ teaspoon ground coriander (optional, for a subtle citrusy note)
1 tablespoon sugar (or brown sugar)
½ teaspoon red pepper flakes (optional, for a little heat)
½ cup cold water
2 tablespoons liquid smoke (to mimic the smoked flavor if not smoking it traditionally)
Directions
- Prepare the Meat Mixture
In a large bowl, combine the ground beef (or beef and pork mix) with the curing salt, kosher salt, black pepper, mustard seeds, garlic powder, onion powder, smoked paprika, ground coriander (optional), sugar, and red pepper flakes (optional).
Add the cold water and liquid smoke.
Mix thoroughly with clean hands or a stand mixer until the meat becomes very sticky — this helps it bind well. - Shape the Sausage
Divide the mixture into 2–3 even portions.
Shape each into a tight, firm log about 2 inches in diameter.
Wrap each log tightly in plastic wrap, twisting the ends to seal.
Refrigerate for 24 hours to allow the flavors to develop and the curing process to start. - Bake the Sausage
Preheat your oven to 170–180°F (75–80°C).
Remove the plastic wrap and place the sausage logs on a wire rack set over a baking sheet (to catch drips).
Bake for about 3 to 4 hours, or until the internal temperature of the sausages reaches 160°F (71°C). - Cool and Store
Let the sausages cool at room temperature for about 1 hour.
Wrap them tightly in foil or plastic wrap.
Refrigerate for up to 3 weeks, or vacuum seal and freeze for up to 6 months.
Table of Contents
Gathering the Goodness: Essential Ingredients for Perfect Summer Sausage
Creating a delicious summer sausage starts with choosing the right ingredients — the foundation of its signature flavor and irresistible texture. Here’s everything you’ll need to craft a traditional version at home:
Essential Ingredients:
- Ground Beef (1 lb.) – Choose lean, high-quality beef for a rich, hearty base.
- Ground Pork (1 lb.) – Adds juiciness and classic sausage flavor; opt for fresh, well-marbled pork.
- Curing Salt (1 tsp.) – Helps preserve the sausage and gives it that characteristic color and tang.
- Mustard Seeds (1 tbsp.) – Brings a delightful pop of spice and traditional texture.
- Cracked Black Pepper (1 tbsp.) – For that bold, peppery kick.
- Garlic Powder (1 tsp.) – Infuses the sausage with a warm, savory undertone.
- Sugar (1 tsp.) – Balances the flavors and aids in fermentation.
- Liquid Smoke (1 tbsp.) – Provides that essential smoky flavor without needing a smoker.
Thoughtful Alternatives:
- Vegan Option: Swap out the ground meats for plant-based ground alternatives. Look for versions with a firm texture to mimic the authentic bite of traditional sausage.
- Gluten-Free Alternative: Ensure that all seasonings, spices, and curing salts are labeled gluten-free. Some curing products and spice mixes can contain hidden gluten, so double-check labels.
Pro Tips for Ingredient Selection:
- Freshness is Key: Always choose fresh, high-quality meat from a trusted source — it dramatically impacts flavor and safety.
- Natural Smoke is Best: If available, select a natural liquid smoke product made from real hardwoods for a deeper, more authentic smoky taste.
- Coarse-Grind Your Spices: Using coarse mustard seeds and cracked pepper instead of fine powders adds beautiful texture and a rustic, artisanal feel to your finished sausage.
Step-by-Step Crafting: Bringing Your Summer Sausage to Life
There’s real joy in the hands-on process of making summer sausage — feeling the textures, breathing in the spice-laden air, and finally tasting a slice of your own creation. Here’s a step-by-step guide to bring your homemade summer sausage to perfection:
Step 1: Preparing the Meat
Start by chilling your ground beef and pork in the refrigerator for about 30 minutes. Cold meat is easier to handle and prevents the fats from smearing, which keeps your sausage tender and juicy. As you remove the meat from the fridge, you’ll notice it’s firm yet pliable — the perfect texture for mixing.
Step 2: Mixing the Seasonings
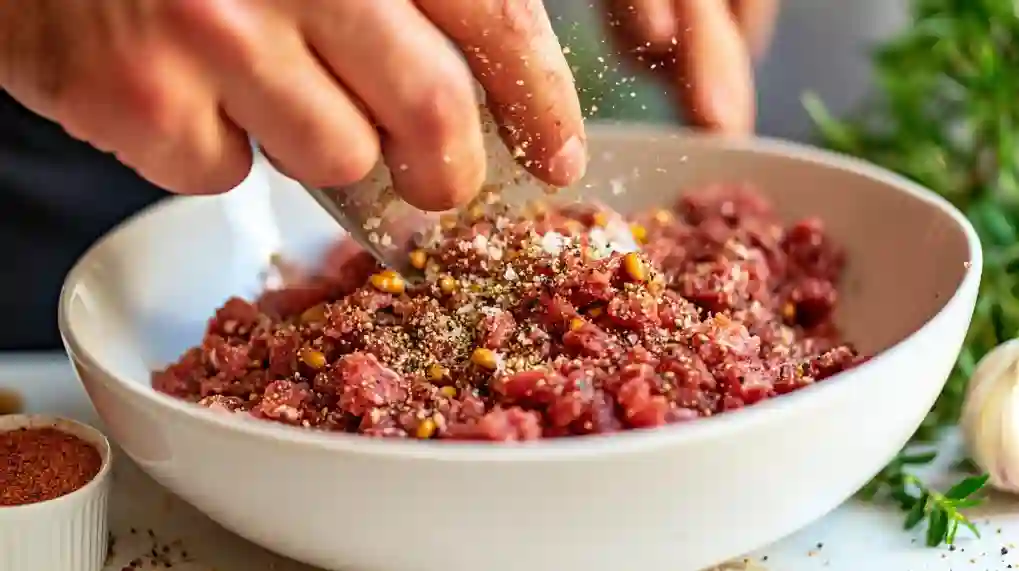
In a large mixing bowl, combine your chilled meats with the curing salt, mustard seeds, black pepper, garlic powder, sugar, and liquid smoke. As you work the mixture with your hands, feel the spices blending into the meat. The air fills with the bold aroma of garlic and the sharp, almost citrusy scent of mustard seeds. Mix thoroughly but gently, ensuring even distribution without overworking the meat, which can make the sausage dense.
Tip: Wear food-safe gloves for easier mixing and less mess!
Step 3: Forming into Logs
Divide the seasoned meat mixture and shape it into firm, compact logs about 2 inches in diameter. Wrap each log tightly in plastic wrap, smoothing out any air pockets. You’ll want them to look like well-packed, even cylinders — this helps them cook evenly later.
Sensory Note: As you press the meat into shape, it should feel cohesive but not dry — a soft, slightly sticky consistency is ideal.
Step 4: Curing in the Refrigerator
Place the wrapped logs in the refrigerator and let them cure for 24 to 48 hours. This slow, cold rest allows the flavors to meld deeply and the curing agents to work their magic. When you open the fridge during this time, you might catch a faint whiff of smoky spice — a hint of the deliciousness to come.
Tip: Place the logs on a wire rack inside a baking sheet to ensure proper airflow and prevent soggy bottoms.
Step 5: Cooking the Sausage
After curing, it’s time to bring your sausages to life!
Option A: Baking Preheat your oven to 170°F (75°C). Remove the plastic wrap and place the logs on a baking rack over a tray. Bake slowly for about 3 to 4 hours until the internal temperature reaches 160°F (71°C).
The smell will be intoxicating — smoky, peppery, and mouthwatering.
Option B: Smoking If you have a smoker, preheat it to 160°F (71°C) and smoke the sausages gently for 3 to 4 hours, monitoring the internal temperature closely. Authentic wood smoke (like hickory or applewood) infuses a deeper, traditional flavor that’s unforgettable.
Tip: Always use a meat thermometer to ensure food safety and avoid overcooking. Overcooked sausage can turn dry, so pull it from heat right when it hits 160°F.

Step 6: Cooling and Slicing
Once cooked, allow the sausages to cool completely on a wire rack. As they cool, they’ll firm up beautifully, making slicing easier. The outer casing will become slightly taut, locking in all those smoky, savory juices.
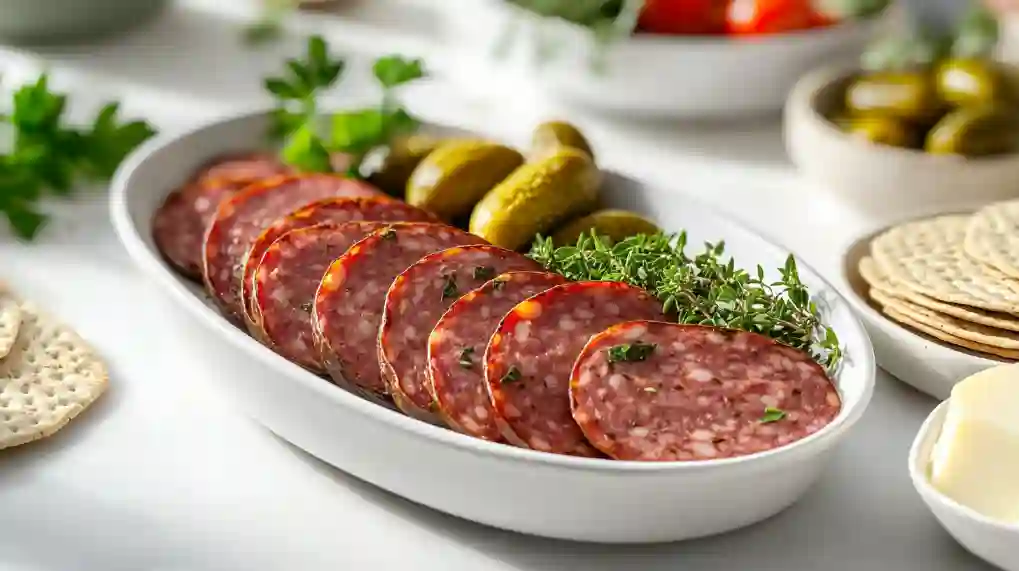
Slice thin and admire the deep pink interior, dotted with mustard seeds and pepper specks — a handmade masterpiece ready to impress.
Tips, Variations, and Serving Ideas: Personalizing Your Perfect Summer Sausage
One of the true joys of making summer sausage at home is the freedom to tailor it exactly to your tastes and dietary needs. Here are some smart tips, flavorful variations, and delicious serving suggestions to inspire your creativity:
Dietary Modifications:
- Low-Sodium Version: Simply reduce the curing salt and opt for low-sodium seasoning blends. Homemade sausages allow you to control salt levels without sacrificing flavor.
- Sugar-Free for Keto: Skip the sugar entirely or replace it with a keto-friendly alternative like erythritol. The smoky spices shine even more when the sweetness is toned down, making it perfect for low-carb diets.
Flavor Variations:
- Jalapeño and Cheddar: Add diced jalapeños and small cheddar cubes to your meat mixture for a spicy, creamy twist that’s always a crowd-pleaser.
- Cranberry and Walnut: For a gourmet flair, mix in chopped dried cranberries and toasted walnuts. This sweet-and-savory combination pairs beautifully with wine and cheese.
- Spicy Chili Blend: Kick up the heat by adding red pepper flakes, smoked paprika, and a pinch of cayenne. Perfect for those who like their sausage with a bold, fiery punch!
Serving Suggestions:
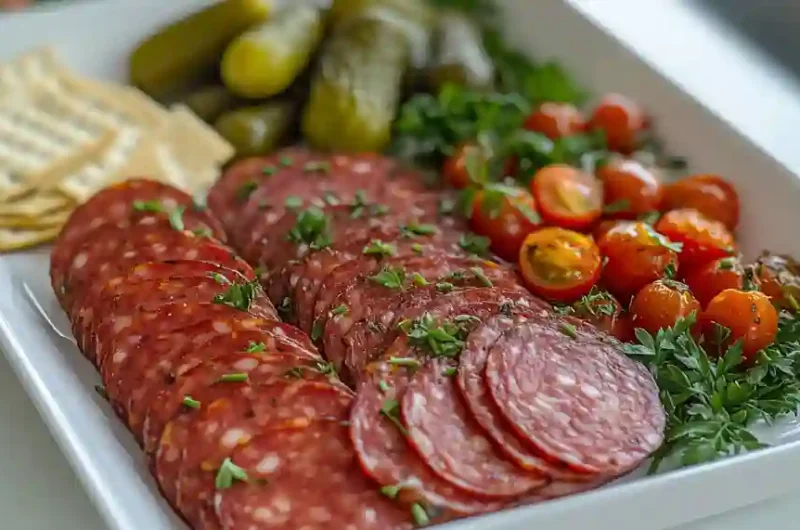
- Charcuterie Board Star: Slice the summer sausage thin and arrange it alongside cheeses, olives, and fresh fruits. It’s a rustic, hearty addition that elevates any spread.
- Sandwiches and Salads: Layer slices into hearty sandwiches or toss chopped sausage pieces into a salad for a protein-packed boost.
- Classic Snack: Pair slices with tangy mustard, crisp crackers, and a few pickles for a simple yet satisfying snack anytime.
With these tips and ideas, your homemade summer sausage becomes not just a recipe, but an expression of your own culinary style!
Nutritional Spotlight: The Healthier Side of Homemade Summer Sausage
When you make summer sausage at home, you’re not just creating a delicious treat — you’re crafting a smarter, healthier alternative to many store-bought options. Here’s a closer look at the nutritional benefits per serving:
Nutritional Breakdown (Approximate per 2-ounce serving):
- Calories: 180
- Fat: 14g (with leaner cuts reducing fat content)
- Protein: 12g
- Carbohydrates: 1g
This high-protein snack makes an excellent choice for those looking to fuel their day without excessive carbs. When using lean meats like 90% lean beef or ground turkey, you significantly cut down on saturated fats while still enjoying a hearty, flavorful experience.
Health Advantages:
- High-Protein Content: Protein is essential for muscle maintenance, energy levels, and keeping you feeling full longer. Homemade summer sausage offers a satisfying protein boost without the heavy additives found in many commercial sausages.
- Better Ingredients, Better Health: By choosing fresh, lean meats and minimizing artificial preservatives and sodium, your homemade sausage becomes a cleaner, healthier alternative to highly processed supermarket varieties.
Nutrient Boost from Spices:
- Garlic Powder: Beyond its rich flavor, garlic is renowned for its immune-boosting properties, thanks to compounds like allicin, which may help the body fend off illnesses.
- Black Pepper: More than just a seasoning, black pepper aids digestion by stimulating the production of digestive enzymes and promoting gut health.
In every savory bite of your homemade summer sausage, you’re not only tasting tradition — you’re also nourishing your body with real, wholesome ingredients.
Common Mistakes and Easy Fixes: Mastering the Art of Summer Sausage
Even the most seasoned home cooks encounter a few hiccups when making summer sausage — but the good news is, every mistake has a simple fix! Here’s how to troubleshoot the most common issues and ensure your sausage turns out perfect every time:
Mistake: Sausage Too Dry
One of the most frequent problems is ending up with sausage that’s dry and crumbly. This often happens when there isn’t enough fat in the meat blend or the sausage is cooked at too high a temperature.
Fix:
- Add a Little More Fat: Next time, mix in a small amount of pork fat or use meat with a slightly higher fat content to retain moisture.
- Lower the Cooking Temperature: Bake or smoke the sausage slowly at a lower heat (around 160-170°F) to prevent drying out and preserve juiciness.
Mistake: Flavor is Bland
Homemade sausage should burst with smoky, peppery, and savory notes. If yours tastes flat, the problem is usually in the seasoning or the curing time.
Fix:
- Extend the Cure: Let the sausage cure in the refrigerator a full 48 hours to allow flavors to fully develop.
- Double-Check Measurements: Always measure your spices carefully. A slight under-seasoning can make a big difference in the final taste.
Mistake: Sausage Falls Apart
A sausage that crumbles when sliced lacks the proper bind, usually caused by insufficient mixing.
Fix:
- Mix Thoroughly: Knead the meat and spices until the mixture becomes tacky and sticky. This texture ensures the proteins have properly bonded, giving you a firm, sliceable sausage.
By knowing these quick fixes, you’ll be well on your way to mastering homemade summer sausage with confidence and ease!
FAQs: Everything You Need to Know About Homemade Summer Sausage

When it comes to making your own summer sausage, a few questions often pop up — and we’re here to answer them! Here’s what you need to know to feel confident and excited about your homemade creation:
How Long Does Summer Sausage Last?
When properly stored, summer sausage has an impressive shelf life.
- Refrigerated: Wrapped tightly or stored in an airtight container, it can last for up to 3-4 weeks.
- Frozen: Vacuum-sealed and frozen, it can keep its quality for 6 months or even longer without losing flavor or texture.
Tip: Always label with the date when freezing for easy tracking!
Can I Prepare It Ahead of Time?
Absolutely — and in fact, it’s highly recommended!
Allowing your summer sausage to cure and rest after cooking gives the flavors more time to deepen and develop. Preparing it several days or even a week ahead can result in an even more delicious, balanced taste that’s perfect for entertaining or meal prep.
Do I Need a Smoker to Make Authentic Summer Sausage?
Not at all!
While traditionalists love using a smoker for that deep, woodsy aroma, you can achieve outstanding results without one. Liquid smoke is an excellent alternative that captures the essence of traditional smoking. Baking the sausage slowly at a low temperature while incorporating liquid smoke into the mix gives you that irresistible flavor, no smoker required.
Homemade summer sausage is all about flexibility — adapting techniques to your kitchen while delivering bold, classic flavors.
Bringing It All Together: Your Homemade Summer Sausage Journey Begins
Making summer sausage at home is more than just a recipe — it’s a truly rewarding experience. Not only do you get a healthier, cleaner product by controlling the ingredients, but you also have endless ways to customize flavors to suit your tastes. Plus, the deep, smoky aroma and satisfying bite of a homemade sausage are simply unmatched by anything store-bought.
Whether you’re aiming for a low-sodium snack, a keto-friendly treat, or a gourmet variation packed with bold spices, crafting your own summer sausage opens up a whole new world of culinary creativity. And trust me — once you taste the results, you’ll wonder why you didn’t try it sooner!
Ready to roll up your sleeves and dive in? I encourage you to give this satisfying project a try — it’s easier (and more fun) than you think! When you do, I’d love to hear about your creations. Feel free to share your versions, tips, or any questions in the comments below.
And if you’re looking for more delicious homemade projects, be sure to check out my other popular recipes like “Ribeye Steak with Bone Marrow“ or “Smoked Meatloaf Recipe“ — perfect companions for your growing DIY kitchen adventures!