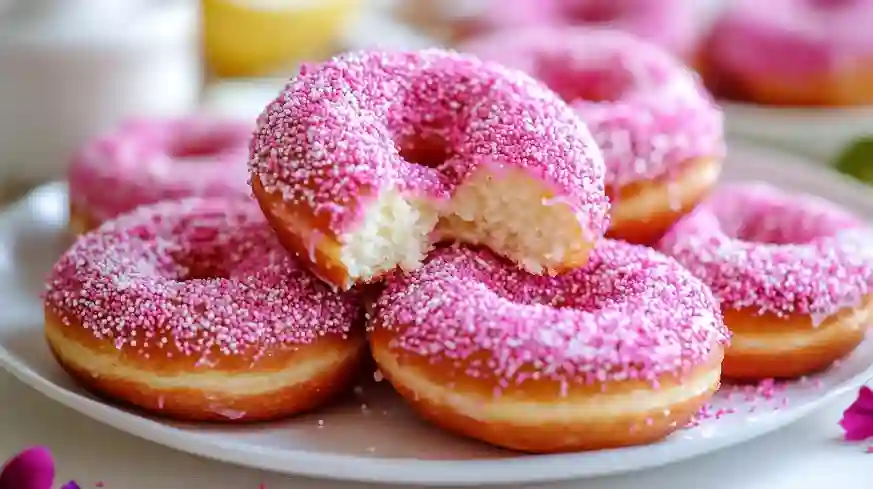
Pink Sprinkle Donut with a vibrant hibiscus-orange glaze and rainbow sprinkles. Step-by-step guide, pro tips, and make-ahead options included.
There’s something undeniably charming about a pink-sprinkled donut. It’s the kind of treat that beams at you from a bakery case, unapologetically joyful—almost daring you not to smile. But behind that playful frosting lies a surprisingly nuanced pastry, especially when it’s built on a yeasted dough, infused with subtle notes of orange zest and nutmeg, and finished with a tangy hibiscus glaze that whispers grown-up flair.
This recipe is for anyone who’s looked at a display of donuts and thought: “Could I actually make that?” Spoiler alert: you can. And the results? Deeply satisfying. These aren’t just donuts—they’re the kind you remember. Soft, pillowy centers. That slightly elastic bite. And a bright glaze that doesn’t just sit there looking pretty—it sings.
In the sections ahead, we’re breaking it all down—every knead, rise, and dunk. We’ll talk dough tricks, frying finesse, and glaze magic. Plus, if you’re the kind of baker who likes options, we’ll give you flavor swaps, storage tips, and fix-it strategies for common mishaps.
This isn’t just about making donuts. It’s about reclaiming the magic of them—at home, with your own hands.

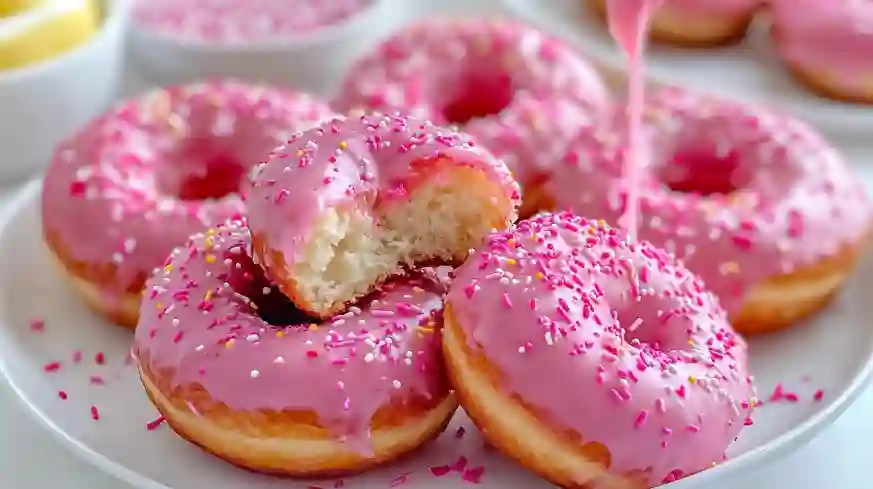
Classic Pink Sprinkle Donut with Hibiscus Glaze
Course: BreakfastCuisine: AmericanDifficulty: Easy4 – 6
servings2
hours30
minutes20
minutes~300 kcal per serving
kcalBakery-style yeasted donuts topped with a vibrant hibiscus-orange glaze and rainbow sprinkles
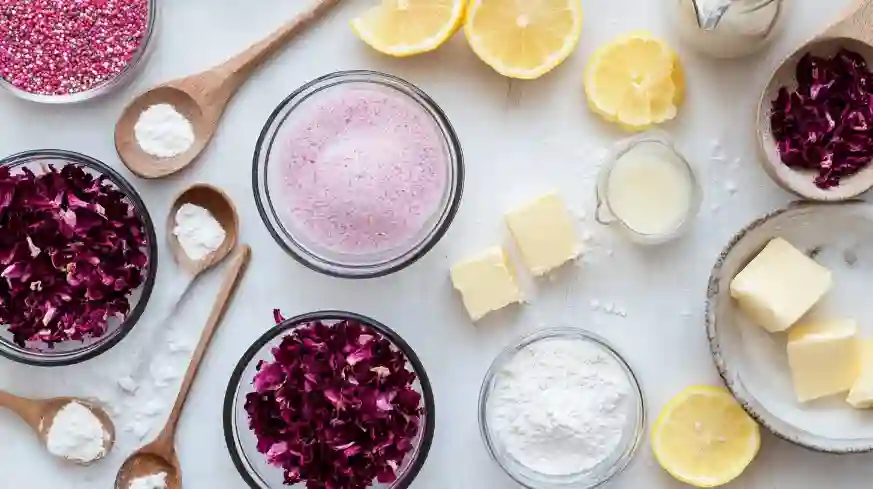
Ingredients
Dough:
3 ¼ cups all-purpose flour
¾ cup whole milk, warm (105–110°F)
¼ cup granulated sugar
2 ¾ tsp active dry yeast
2 eggs, room temperature
4 tbsp unsalted butter, softened
½ tsp salt
½ tsp ground nutmeg
Zest of 1 orange
Glaze:
2–3 hibiscus tea bags or 2 tbsp loose hibiscus
1 cup water
2 cups powdered sugar, sifted
1–2 tsp whole milk
Optional: ¼ tsp orange zest
Topping:
Rainbow sprinkles (or other toppings)
Directions
- Bloom yeast: Combine warm milk, 1 tsp sugar, and yeast. Let foam 5–10 mins.
- Mix dough: Combine dry ingredients. Add yeast mix, eggs, butter. Knead 8 mins.
- First rise: Cover bowl. Let dough rise 1.5–2 hrs until doubled.
- Roll & cut: Roll dough ½ inch thick. Cut into rings. Place each on parchment square.
- Second rise: Cover. Let donuts puff 45–60 mins.
- Heat oil: Bring oil to 350–365°F.
- Fry: Fry 2–3 donuts at a time for 1–1.5 mins per side. Drain on rack.
- Make glaze: Steep hibiscus in 1 cup hot water 10–15 mins. Reduce to ¼ cup. Whisk with sugar, milk, zest.
- Glaze & decorate: Dip cooled donuts. Add sprinkles immediately.
- Set & serve: Let glaze set 10–15 mins. Serve fresh!
Table of Contents
Why Yeasted Over Cake Donuts?
Ask any donut devotee, and they’ll tell you—there’s a quiet divide between cake and yeasted donuts. It’s not a rivalry exactly, but once you’ve bitten into a freshly fried yeasted donut, you’ll understand why some bakers never go back.
Yeasted donuts, like the ones in this recipe, lean airy, light, and subtly chewy. That comes from the fermentation—letting the dough rise slowly to develop flavor and structure. It’s the same magic behind great bread. When done right, a yeasted donut should almost feel like biting into a cloud with just enough resistance to remind you it’s real.
In contrast, cake donuts are denser, richer, and more immediate—made from a batter that’s leavened with baking powder or soda, then piped and fried. Think of them as the quick-fix version. Tasty, sure. But they often lack that stretchy, soulful bite that yeasted donuts deliver.
Yeasted donuts also absorb flavor differently. The subtle background notes—citrus zest, nutmeg, even the tang from the glaze—don’t get buried under a heavy crumb. They linger. They dance.
And let’s be honest—there’s something deeply satisfying about making dough rise. Watching it puff, cutting perfect rings, proofing them like a pro—it’s kitchen alchemy, and you’re the wizard.
H3: What’s the biggest challenge with yeasted donuts?
The timing. Yeasted dough needs rest to rise properly. That means you’ll need to plan ahead (but not excessively—this recipe includes make-ahead tips). The reward? A donut that’s got real bakery DNA.
Ingredient for Pink Sprinkle Donut
Donuts might look simple, but every ingredient in this recipe plays a layered role—flavor, texture, structure, even color. Here’s a breakdown of the why behind the what, and how you can tweak things if needed.
The Dough
- All-purpose flour: The reliable base. It strikes a balance between tenderness and chew. Want a slightly lighter texture? Swap ½ cup for bread flour.
- Whole milk: Enriches the dough with fat and sugars, helping it brown and soften. Lactose-free milk works fine. Oat milk is a solid plant-based swap, but avoid thin, watery alternatives.
- Granulated sugar: Feeds the yeast and sweetens the base. Coconut sugar can be used for a richer, caramel-tinged flavor, but keep ratios the same.
- Active dry yeast: The lift engine. Make sure it’s fresh—stale yeast equals sad, flat donuts. Instant yeast? Use 25% less and skip blooming.
- Eggs: Bind and enrich. For an egg-free version, 1 tbsp of ground flaxseed mixed with 3 tbsp of water (per egg) works, but the texture will shift.
- Butter: Tenderizes and adds flavor. Vegan? Use plant-based butter sticks—not margarine.
- Orange zest & ground nutmeg: These aren’t throwaways. Orange adds brightness. Nutmeg lends that “bakery” warmth. Sub lemon zest for a sharper tone or cardamom for a floral lift.
- Salt: Enhances everything. Don’t skip it.
The Glaze
- Hibiscus tea: The secret star. It’s tangy, naturally pink, and floral. You’ll steep it like tea, then reduce. Can’t find hibiscus? Try:
- Freeze-dried strawberry powder (bright, berry-sweet)
- Raspberry reduction (a little more tart, deeper color)
- Cherry juice + lemon (for that zing)
- Powdered sugar: Base of the glaze. Sift it to avoid lumps.
- Whole milk (again): Just a splash to loosen the glaze. Any milk will do here.
Sprinkles
Optional? Technically. But they’re part of the donut’s joy DNA. Go classic rainbow jimmies or mix it up with crushed freeze-dried fruit or candied citrus zest.
H3: Can I make these donuts vegan or dairy-free?
Absolutely—with caveats. Swap the butter for plant-based sticks, the milk for oat or soy, and the egg for a flax egg. Expect a slightly different rise and crumb—still delicious, just a touch less rich.
Equipment You’ll Need
You don’t need a commercial kitchen to make bakery-level donuts—but a few key tools will make the process smoother, cleaner, and way more enjoyable. Think of this as your donut-making toolkit. If you’re missing one or two, don’t panic—there are workarounds.
Essentials
- Stand mixer with dough hook: It makes kneading a breeze, especially for enriched dough. If you’re doing it by hand, be prepared to knead for 10–15 minutes.
- Rolling pin: Helps get an even thickness—don’t eyeball it.
- Donut cutter or 3-inch & 1-inch round cutters: To get those classic rings. A drinking glass and bottle cap also work in a pinch.
- Dutch oven or heavy-bottomed pot: Even heat retention is crucial for safe, consistent frying.
- Deep-fry thermometer: This is non-negotiable. You want oil between 350–365°F. Too cold = greasy donuts. Too hot = burnt outside, raw inside.
- Spider strainer or slotted spoon: For flipping and lifting the donuts without splashing oil everywhere.
- Cooling rack over a baking sheet: Keeps your donuts crispy while excess oil drips away.
- Parchment paper squares: Place each cut donut on its own square to transfer easily into oil without deflating.
Nice-to-Haves
- Infrared thermometer: For double-checking oil temperature without dipping a probe.
- Pastry brush: Helps you clean off extra flour before frying or apply glaze precisely.
- Piping bag (if you decide to get fancy with fillings later).
H3: Can I make these without a thermometer?
Technically yes, but it’s risky. A small piece of bread should brown in 45 seconds at the right temp, but that’s not precise. A thermometer takes out the guesswork—and protects your donuts (and your ego).
Step-by-Step Dough & Proofing (with Photos)
This is where the real magic begins. Donut dough is richer than standard bread, but it behaves the same way in many respects—stretchy, slow, and extremely rewarding. Take your time with it. The dough will tell you what it needs if you know how to listen (and smell, and feel).
1. Bloom the yeast
Warm the milk to about 105–110°F (not hot—think warm bath water). Stir in a teaspoon of sugar and the yeast. Let it sit for 5–10 minutes. It should foam like a cappuccino head. No foam? Your yeast is either dead or your milk was too hot.
2. Mix the dough
In your stand mixer bowl (or large mixing bowl), combine the flour, sugar, salt, nutmeg, and orange zest. Add the bloomed yeast mixture, eggs, and softened butter. Using the dough hook, mix on low for 2 minutes, then medium for 6–8 minutes—until the dough slaps the side of the bowl and clears the bottom.
By hand? Expect a sticky, elastic workout. It should be slightly tacky but not soupy. Add a tablespoon of flour if it’s unworkably wet—but don’t go overboard.
3. First proof (bulk rise)
Form the dough into a ball, lightly oil the bowl, and cover with plastic wrap or a damp towel. Let it rise somewhere warm (75–80°F is ideal) for 1.5 to 2 hours—until doubled.
Cold kitchen hack: Place the bowl in your (turned-off) oven with the light on.
4. Punch down & roll
Gently deflate the dough with your fingertips. Turn it onto a lightly floured surface and roll it out to about ½ inch thickness. Use your cutters to stamp out donut rings, placing each on its own parchment square.
5. Second proof (shaping rise)
Cover the cut donuts loosely and let them rise again for 45–60 minutes. They should puff slightly and feel pillowy—not collapsed. This is the proof that sets your final texture.
[Insert realistic image strip here: one photo per step]
- Image 1: Blooming yeast in milk
- Image 2: Dough coming together in mixer
- Image 3: Finger dent in risen dough
- Image 4: Cut donuts resting on parchment squares
H3: How do I know if the dough is proofed enough?
Use the “poke test.” Gently press a finger into the dough—if it springs back slowly and leaves a slight indent, it’s ready. If it springs back instantly, it needs more time. If it collapses, it over-proofed—fry it anyway, but expect a flatter result.
Cutting & Frying Technique
This is where your yeasted rings transform from soft dough into golden, puffed magic. Frying can feel intimidating, but with a few key habits and a calm mindset, it becomes almost meditative. Think of this as your donut zen zone.
1. Heat the oil
Fill a heavy pot or Dutch oven with 2 to 3 inches of neutral oil (canola, vegetable, or grapeseed). Clip your thermometer to the side and slowly bring it to 350–365°F over medium heat. Patience is key here. Too hot, and your donuts will brown before cooking through. Too cold, and they’ll soak up oil like a sponge.
Pro tip: Let the oil preheat fully before adding donuts. Stabilize the temp between batches—heat drops fast after you fry a few.
2. Set up your station
Place a cooling rack over a baking sheet nearby. Have your spider strainer, extra parchment squares, and a timer ready. Move deliberately—once the donuts hit the oil, things move quickly.
3. Transfer donuts with parchment
Don’t lift raw donuts by hand. Instead, pick them up with their parchment square and gently lower them into the oil—parchment side down. After 10 seconds, use tongs or your spider to remove the paper. This prevents stretching or deflating the dough.
4. Fry in small batches
Fry 2–3 donuts at a time—no crowding. Cook each side for 1 to 1½ minutes until deep golden. Flip once gently with your spider. Watch the bubbles—small, steady bubbles = good. Wild spitting = too hot.
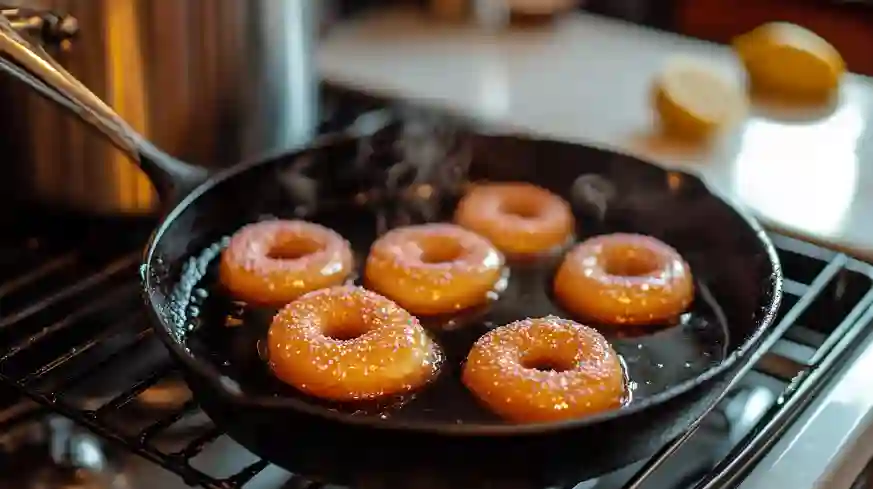
Color check: They should look warm golden brown, not mahogany. Underdone donuts often look pale or splotchy.
5. Cool completely
Let the donuts drain and cool on your wire rack. Don’t glaze while hot—unless you like a melty mess. Once cool but still warm-ish, they’re ready for their hibiscus crowning glory.
H3: What do I do with the oil after frying?
Let it cool completely. Strain it through a fine mesh sieve or cheesecloth to remove crumbs, and store it in a clean container for up to 3 uses (as long as it doesn’t smell off). Never pour it down the drain—dispose in the trash if not reusing.
Making & Applying Hibiscus-Orange Glaze
This is where the donuts become a visual and flavor celebration. The hibiscus-orange glaze is what sets these apart—a tangy, slightly floral topping that’s as eye-catching as it is mouthwatering. It’s like painting your donuts with edible joy.
1. Steep and reduce the hibiscus
Boil 1 cup of water and steep 2–3 hibiscus tea bags (or 2 tablespoons loose hibiscus petals) for 10–15 minutes. The liquid should be a deep, jewel-toned magenta. Strain, then simmer the tea on low until reduced to about ¼ cup. This intensifies both flavor and color.
Note: Don’t skip the reduction. It keeps your glaze from going runny or dull.
2. Mix the glaze
In a medium bowl, whisk together:
- 2 cups powdered sugar (sifted)
- ¼ cup reduced hibiscus concentrate
- 1–2 teaspoons milk (adjust for consistency)
- Optional: ¼ teaspoon orange zest for extra brightness
Whisk until silky and pourable—thicker than maple syrup, thinner than frosting. It should run off a spoon in a smooth ribbon.
Too thin? Add powdered sugar.
Too thick? Add a teaspoon of milk at a time.
3. Dip with confidence
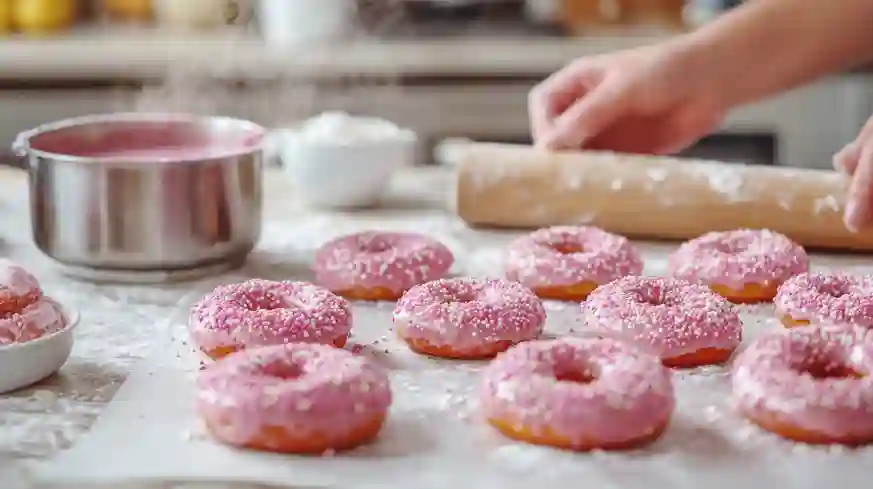
Hold each cooled donut upside down and dunk just the top into the glaze. Lift, give it a gentle swirl to let excess drip back, then flip it upright and place it back on the rack. Add sprinkles immediately—glaze sets quickly.
If you’re going for full coverage, spoon the glaze over the top and let it drip down the sides for that bakery-drip effect.
4. Let them set (or don’t)
The glaze will crust slightly after 10–15 minutes, forming that classic donut shell. If you’re impatient, dive in early. We’re not here to judge.
H3: Can I use something other than hibiscus?
Definitely. Try these:
- Freeze-dried strawberries, crushed and mixed with milk for a berry-forward glaze.
- Raspberry juice + lemon for tart brightness.
- Cherry juice with a drop of almond extract for a grown-up twist.
Each swap changes the color and mood of the glaze—play around until it fits your vibe.
Decorating & Serving
This is the part that feels like pure joy. Decorating donuts isn’t just about aesthetics—it’s where personality meets pastry. And when you’re working with a bright pink glaze, the creative energy practically jumps out of the bowl.
Go classic—or go rogue
The traditional route? Rainbow sprinkles, generously scattered over the freshly glazed tops. They stick best within the first 30 seconds after dipping. But if you want to play outside the lines, consider:
- Crushed freeze-dried berries for a tart crunch.
- Edible dried flowers (like rose or lavender) for a botanical vibe.
- Candied citrus peel for a sophisticated twist.
- Toasted coconut flakes for a tropical nudge.
- A pinch of flaky salt to punch up contrast.
Mix and match. Or don’t. Sometimes simplicity sings loudest.
When to serve
These donuts are at their best within 4 hours of frying. That’s when the texture is peak-soft and the glaze still has its delicate shell. But if you must store them, a loosely covered container at room temp will keep them decent for 1–2 days. Just know: they’ll never be as euphoric as they are fresh.
Serving ideas
- Stack them on a cake stand like a donut tower centerpiece.
- Pair with hibiscus tea or fresh citrus juice for a themed brunch.
- For parties, offer glaze and topping “stations” so guests can DIY.
H3: Can I make these look bakery-perfect?
Yes—and no. Perfect rings come from consistent thickness and clean cuts, but part of the charm is the homemade vibe. Slightly uneven shapes, rogue sprinkles, a little drip here or there? That’s the soul of small-batch baking. Embrace the wonk.
Make-Ahead, Storage & Reheating Tips
Donuts may be a “moment” food—best when fresh—but that doesn’t mean you’re stuck frying them at 6 AM for brunch. With a little planning, you can make yeasted donuts fit your schedule without sacrificing that cloud-like bite.
Making the dough ahead
After the first rise (when the dough has doubled), punch it down and cover tightly. Pop it in the fridge overnight (up to 18 hours). The cold slows fermentation, giving you flexibility—and better flavor. In the morning, bring it to room temp for 30–45 minutes before rolling and cutting.
Bonus: Cold dough is easier to handle and cut cleanly.
Freezing pre-fried donuts
Want to really prep ahead? After cutting your donuts and placing them on parchment squares, freeze them in a single layer. Once solid, transfer to a zip-top bag. When ready to fry, let them thaw and proof at room temperature for 1–2 hours until puffed and ready.
Storing fried donuts
Let’s be honest—donuts are best day-of. But here’s how to extend the magic:
- Room temp: Store in a loosely covered container for up to 2 days. Airtight traps moisture, which softens the glaze and dulls texture.
- Refrigeration: Not ideal. It dries out the crumb and makes the glaze weep.
- Freezing glazed donuts: You can do it—but freeze unglazed for best results. Re-glaze after warming.
Reheating
Avoid the microwave unless you want rubbery sadness. Instead:
- Oven method: 300°F for 5–7 minutes. Place on a baking sheet uncovered.
- Air fryer: 300°F for 2–3 minutes. Don’t crowd them.
- Glaze tip: Add glaze after reheating if it’s stored separately. If already glazed, expect a bit of sheen loss, but the flavor holds.
H3: How long can I keep the glaze?
Stored in an airtight container, the hibiscus glaze lasts 4–5 days in the fridge. It will thicken slightly—just add a splash of milk and whisk before using.
Common Problems & Fixes
Even seasoned bakers run into donut drama. The dough doesn’t rise. The oil smokes. The glaze slides off like it’s ghosting your efforts. Don’t stress—here’s how to troubleshoot the usual suspects and get back on track.
Problem: Dough didn’t rise
Possible causes:
- Dead yeast (always check expiration dates).
- Water/milk too hot (kills yeast) or too cold (delays activation).
- Cold kitchen.
Fix:
- Move the bowl somewhere warmer (oven with the light on or a warm laundry room).
- Wait longer—proofing is flexible, not exact.
Problem: Donuts are dense or heavy
Likely reasons:
- Under-proofed (they didn’t rise enough after cutting).
- Too much flour (common when hand-kneading).
Fix:
- Next time, let the cut donuts puff visibly before frying—they should feel airy to the touch.
- Knead until smooth and elastic—use the windowpane test.
Problem: Donuts are oily/greasy
You probably:
- Fried at too low a temperature.
- Crowded the pot (which dropped the oil temp fast).
Fix:
- Always use a thermometer.
- Fry in small batches, letting the oil return to 350–365°F between rounds.
Problem: Glaze won’t stick or slides off
Most common cause: Donuts were too warm or too cool when glazed.
Fix:
- Glaze while donuts are just warm—not hot.
- If glaze is too thin, add more powdered sugar.
- Dab excess oil off donut tops before dipping.
Problem: Uneven color or frying
It could be:
- Uneven oil heat (hot spots in the pot).
- Floating parchment stuck underneath.
Fix:
- Stir the oil gently between batches.
- Remove parchment quickly once donut is in the oil.
H3: My glaze is too dull—what gives?
Over-whisking, watery hibiscus, or milk-heavy adjustments can mute the color. Use reduced hibiscus for pigment, and add a drop of beet juice or food coloring if you need a visual punch.
Nutrition Facts (per serving)
Let’s be real—nobody’s reaching for a pink sprinkle donut because they’re counting macros. Still, if you’re curious (or need to track), here’s a rough nutritional breakdown for one standard donut, glaze and all.
Serving size: 1 donut (approx. 3-inch ring)
Yield: ~12 donuts
Estimated Per Donut:
- Calories: 290–310 kcal
- Total Fat: 14g
- Saturated Fat: 5g
- Cholesterol: 40mg
- Sodium: 180mg
- Total Carbohydrates: 38g
- Sugars: 18g
- Protein: 4g
- Fiber: 1g
Note: These numbers vary based on oil absorption during frying, exact glaze thickness, and topping quantity (read: sprinkles).
If you swap ingredients (like plant-based milk or egg alternatives), the fat and protein values may shift slightly, but the core numbers will hover in the same range.
H3: Is there a way to make them lighter?
Sure. Bake instead of fry (expect texture changes), go light on glaze, or use a smaller cutter for mini donuts. But honestly? Let them be what they are—a treat. No guilt needed.
Frequently Asked Questions (FAQs)
H3: Can I bake these instead of frying?
You can—but they won’t be quite the same. Baked yeasted donuts come out more like enriched rolls than true donuts. If you go this route, bake at 375°F for 8–10 minutes, then glaze while warm. They’ll be tasty—just a little more bready than chewy.
H3: How do I know when the oil is ready?
Use a thermometer to hit 350–365°F. If you don’t have one, drop a small piece of dough in the oil—if it rises and starts bubbling steadily within 5 seconds, you’re good. If it sinks and sits there, wait longer. If it sizzles violently, lower the heat.
H3: Can I freeze leftover donuts?
Yes—with caveats. For best results, freeze them unglazed in an airtight container. Reheat in the oven at 300°F for 5–7 minutes, then glaze fresh. Glazed and frozen? Expect the texture to soften and the glaze to lose its sheen—but flavor still holds up.
H3: Can I use instant yeast instead?
Absolutely. Use about 25% less (2 tsp instead of 2¾ tsp). You can mix it directly into the dry ingredients without blooming, but the flavor might be slightly milder without the pre-activation step.
H3: What’s the best way to make them all the same size?
Roll the dough evenly (½ inch thick), and use a consistent cutter. If you want them bakery-uniform, weigh each cut piece before shaping—about 65–70 grams each for standard size.
Conclusion & Reader Call to Action
There’s a quiet kind of pride in making something joyful from scratch. These classic yeasted pink sprinkle donuts aren’t just about sugar and nostalgia—they’re a little reminder that indulgence can be intentional, crafted, and deeply personal. You took time. You created layers of flavor. You turned basic ingredients into something that looks like a party and tastes like home.
Maybe they’re a weekend treat. Maybe they’re for a birthday breakfast. Or maybe you made them just because you could—and that’s more than enough.
If you try this recipe, I’d love to hear how it went. Leave a comment, rate the recipe, or share a photo. Your donut twist—whether it’s a different glaze, a wild topping, or a mini version—is part of what makes baking feel communal.
Craving more? Check out our [How to Bake Protein Muffins for Weight Loss], or try the [Irresistible Mini Croissant Sandwiches : Perfect for Brunch or Parties] if you’re in a no-fry mood. But for now, enjoy the magic you just made—preferably while the glaze is still slightly tacky and the donut still warm.